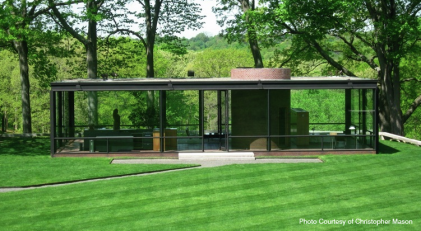
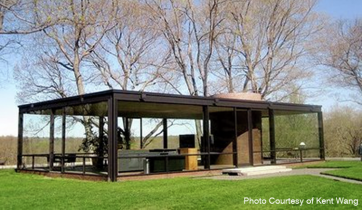
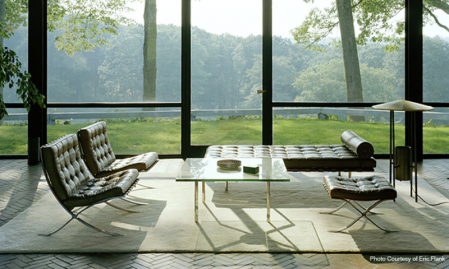
The Glass House is a home designed by the architect Philip Johnson. It is unique in the way that except for the bathroom, it has no opaque walls, only glass curtain walls.
Working on this project has caused me to become very impressed by the ability of Revit to stream line the post-conceptual part of the design process. The ability to take drawings on paper and transform them into a three dimensional representation of the building composed of the actual components that it would consist of if it was constructed is a powerful tool.
Photos of the Actual Building:
Drawings of The Glass House Created in Revit:
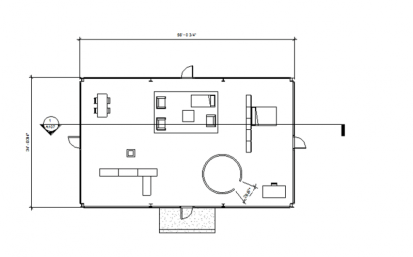
Plan
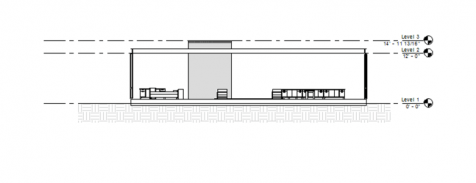
Section A107
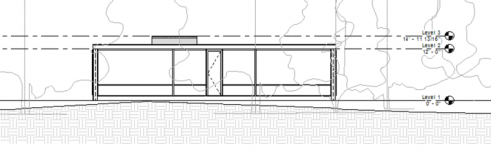
North Elevation
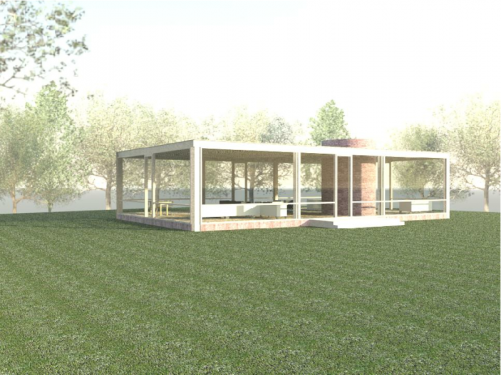
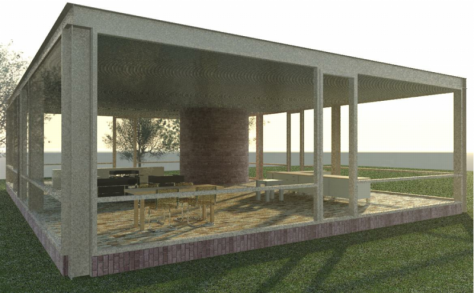
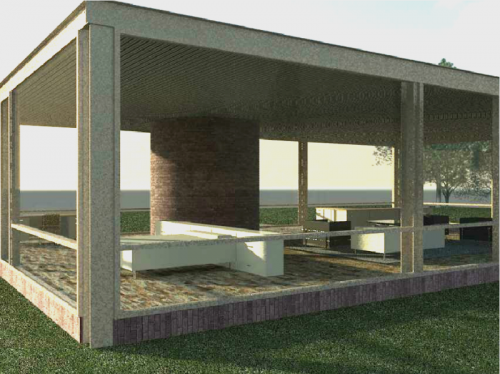
Renderings of The Glass House created in Revit:
The architecture 424 class has been a great resource in learning to use Revit. The lessons that we learned about modifying element instances and types to create custom objects were very helpful in the undertaking of this project. One reason this was important was due to unique doors that reach from the floor to the ceiling. Another place that this was crucial was in creating the custom floor and ceiling slabs.
The intuitive interface and informative help menus have also been a great resource. For example, one aspect of the building that I was unsure about how to model was the glass doors in the curtain walls. By using the help menu, I was able to discover that this was accomplished by selecting one of the panels of the curtain wall and changing that part of the glass into a non-curtain wall. It soon became apparent, however, that since I created my curtain wall without using a preset curtain grid, my curtain wall was not divided into selectable panels. However, thanks to additional use of the help menu and the intuitive interface, I was able to discover that I could use the openings tool to remove the area of the curtain wall I needed gone, place a non-curtain wall in that void, and then place the custom door.
One interesting aspect of designing this building was having to discover how the building was actually put together. This was because the building is not constructed using the conventional residential method of using supporting walls. In the end it was apparent that the building's columns are standard wide flange columns and that it has 4 wide flange beams along the exterior edges. This in turn supports a reinforced concrete ceiling slab, which all rests on a brick floor slab, which then rests atop an additional concrete foundation slab.
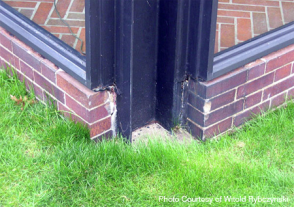
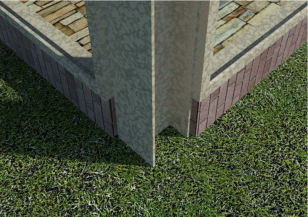
This photo of one of the corner columns alongside the same view in the Revit model illustrates the way the exposed columns and window mullions meet.
One aspect of Revit that I would like to become more knowledgeable about in the future is rendering. Although I am pleased with how the renderings came out, some aspects could have been more true to the actual building. For example, the steel of the actual Glass House is painted black, while the steel in the Revit model is not.
As we begin to delve into Revit, I am pleased to see that the user interface is very similar to the AutoCAD interface. The menus are also intuitive and easily navigated by first choosing a main category from the upper tabs, and then narrowing the categories down to a final specific command. Without prior knowledge of Revit, most commands that I am instructed to carry out can be found relatively easily. Revit will undoubtedly get more complex, however, as we explore aspects of the program that differ greatly from AutoCAD and Google Sketch-up.
Another aspect of Revit that has become apparent as we begin to explore it is how effective it is in streamlining the design process. It differs from AutoCAD and Google Sketch-up in the way that the plans, sections, and detail drawings are being created along with the three dimensional model of the structure. As the model is created, the floor plans are drawn up, and I only need to show where I want to cut a section or have a detail drawing to have it created.
Another way that this program streamlines the design process is due to that the three dimensional models are made up of actual structural parts. When you draw a wall or window, the program automatically knows the all the properties of that component, and this can be used later to gather structural, environmental, and other vital data about the structure.
One aspect of Revit that concerns me as far as its potential as a design tool is whether the component based design process will limit creativity due to constraints on what shapes can be created. Our instructor, however, told us about a tool to create abstract shapes that the structural parts can then be adapted to, and I am interested in experimenting with this aspect.
I am very excited for this class, Revit seems like a very useful program that will be helpful in my future as an architect. I have some experience with computer drafting and modeling programs that will hopefully contribute to my understanding of Revit.
I have experience using AutoCAD. AutoCAD was created by Autodesk, which is the same company that designed Revit. I am very comfortable with AutoCAD with two dimensional designs, as I have used it for a number of years. The user interface for Revit appears to at least be superficially similar to that of AutoCAD so hopefully this experience will translate to understanding Revit.
One thing I have not done with AutoCAD, however, is utilize its three dimensional design tools. It would be interesting to become better acquainted with this design tool as well in order to better understand the advantages and disadvantages of the two different approaches to three dimensional modeling.
The only other three dimensional modeling program I have used in the past is Google Sketch up. I have only used Google Sketch-up once, however, to create a space that was actually rendered in order to create a final image for a project. Furthermore, it was done for a very simple building, and I rendered it using only the "Dennis Effect," in Photoshop. The majority of my sketch up experience has been with creating spaces that I later traced in pen and then rendered with hand media.
Revit is different from Sketch-up, however, in the way that Sketch-up uses lines and geometric volumes in order to create three dimensional designs, and Revit assembles actual building elements to create a three dimensional volume. Hopefully, however, my Sketch-up experience will help me in understanding Revit.
I am excited to learn Revit because it will be an additional way that I can visualize my designs in three dimensions, and it will also be an additional three dimensional modeling tool that I hope will allow me to create final rendered images that are superior to other three dimensional modeling programs.
 RSS Feed